Tuesday, October 31, 2006
Smut Quesadilla and Tortilla Soup
I was in Mexico City the first time I heard of huitlacoche. There was a huitlacoche caesar salad on the menu and after learning what huitlacoche was, I decided that I wasn't ready for it.
That was 10 years ago when I was a much more pedestrian eater. Now I am. So I found some in Sunset Park, Brooklyn. It was in a Goya can. I was with my sister, who told me that even from a can it was pretty good.
As my sister pointed out to me, huitlacoche (also known as corn smut and the corn mushroom) is INFECTED corn, not rotten corn. Nice to know. I love rotten. But infected. . .
As my sister suggested, I made quesadillas with it:
Smut Quesadillas
a bunch of corn tortillas
a can of huitlacoche
oaxacan string cheese or montery jack cheese
onions
avocados
cilantro
make a quesadilla with any combination of those ingredients. Add a squeeze of fresh lime, sour cream and some salt.
And I made tortilla soup (one of my very favortie soups) to go with it.
Tortilla Soup
6 (6-inch) corn tortillas, preferably a little old and dried out
1/4 cup grapeseed oil, peanut oil, other high smoke-point oil
1 small onion, chopped (1/2 cup)
2 cloves garlic, finely chopped
1 medium Anaheim, poblano or jalapeño chile, seeded, veins removed, chopped (Depending on the hotness and flavor desired. You can also mix chiles - 1 Anaheim and a half jalapeño.)
4 cups chicken broth or homemade chicken stock
1 can (14.5 oz) diced tomatoes, undrained (recommended Muir Glen fire-roasted)
1/2 teaspoon coarse salt (kosher or sea salt)
1 1/2 cups shredded cooked chicken
1 ripe medium avocado
1/2 cup shredded Monterey Jack cheese (2 oz) (or other mild, melting cheese)
Chopped fresh cilantro
1 lime, cut into wedges
1 If you are starting with somewhat old, dried out tortillas, great. If not and you are starting with relatively fresh tortillas, put them on a baking sheet and put them in the oven at 200°F for 10-15 minutes to dry them out a bit. It is best to start with tortillas that don't have a lot of moisture in them. Cut tortillas in half; cut halves into 1/4-inch strips. In 3-quart saucepan, heat oil over medium-high heat. Fry strips in oil, 1/3 at a time, until light brown and crisp. Remove from pan; drain on paper towels. Reserve.
2 Heat oil remaining in saucepan over medium-high heat. Cook onion in oil 2 minutes, stirring frequently. Add garlic and chile; cook 2 to 3 minutes, stirring frequently, until vegetables are crisp-tender. Stir in broth, tomatoes and salt. Heat to boiling. Reduce heat; cover and simmer 15 minutes. Add chicken; heat until hot.
3 To serve, peel and pit the avocado. Cut into 1-inch slices. Divide half of tortilla strips among 4 individual serving bowls; ladle in soup. Top with avocado and cheese; garnish with remaining tortilla strips and cilantro. Serve with lime wedges.
I got that recipe from here.
Serves 4.
The soup was fine. Not great. I have had it 10 times better.
The smut was not so great.
Strike one was that it was from a can.
Strike two was that it didn't taste great like so many people told me it did.
Strike three is that it looked like sludge. I was hoping for the huge engourged pieces of corn that looked like fat ticks. None of that. Just sludge.
I am going to try this again, but not until I find some fresh. Maybe in LA.
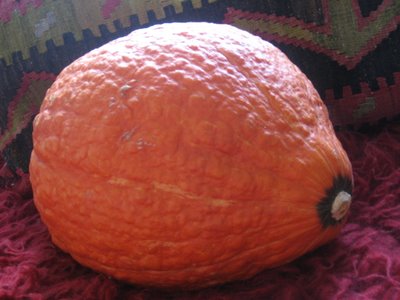
Hoe Cakes
hos gotta eat too.
recipe # 121
More fun named breakfast food. . .
So named, not because they are Ho Food, but because you can prepare them on the back of a garden tool named a hoe.
Hoe Cakes
1 1/2 c. corn meal
1 c. all-purpose flour
1/4 c. Crisco oil
1 1/4 c. buttermilk
1/3 c. sugar
2 eggs, beaten
1 tsp. salt
1 tsp. soda
Combine cornmeal, flour, sugar, salt and soda in medium bowl. Add eggs, oil and buttermilk.
Stir just until ingredients are moistened. Pour into heavily oiled skillet 1/4 cup of batter for
each hoe cake. Fry over medium-high heat 1 or 2 minutes or until golden brown on each
side. Use additional oil if necessary. Drain on paper towels. Serve immediately.
The recipe I found for these was followed with a bible quote from genisis that I will not post here, but feel free to look at it here.
Hoe cakes are the opposite of a crepe. I think that if one were to eat them with your pinky up it would make sense that they would get a beat down. These things are heavy, filling and can be made quickly over high heat or slowly over low heat. A good camp recipe. They would be very good savory, say with hobo beans or pork. But what isn't good with pork?
Monday, October 30, 2006
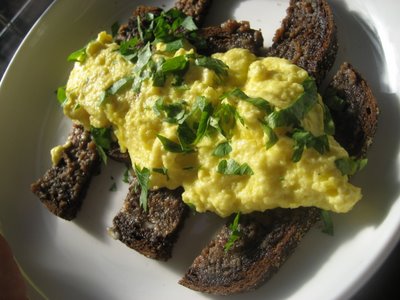
Scotch Woodcock
scotch woodcock, indeed
recipe #118
I made this recipe for 2 reasons. The first and most obvious is because of it's name. The second it because the eggs sounded so delux. This Scottish breakfast/brunch is just terrible for you (except for the nice amount of omega-3 in it). Never make this for someone on lipitor.
It is another fun recipe from my old Joy of Cooking:
Scotch Woodcock
Toast:
--2 slices of bread
Cut into fingers, butter well and spread with a thin layer of:
--Anchovy paste
Beat together:
--3 or 4 egg yolks
--1/2 cup of cream
--1/8 teaspoon pepper
--1/8 teaspoon salt
Melt in a double boiler:
--2 tablespoons of butter
Add egg mixture and scramble until creamy. Arrange the anchovy toast on a hot dish and cover with egg mixture.
Garnish with:
--Chopped parsley
The eggs were fantastic. Use only a very thin layer of anchovy paste unless you love anchovies. It isn't bad. It is actually pretty good, but I think this is the only time I'm going to make this.
Sunday, October 29, 2006
Vit Quay aka Vietnamese Laque Duck
recipe #117
I've never tackled duck before. I never thought it was worth the the try.
This is a recipe from Authentic Vietnamese Cooking by Corinne Trang. I like this cookbook, even though it gets panned in Amazon.com reviews.
Vit Quay
1/3 c. fish sauce
1 tbs. thick soy sauce
1 tbs. honey
2 tsp. 5 spice powder
One 5.5 lb. Long Island duck
2 ounces. fresh ginger, cut into slices and then crushed
2 scallions chopped and crushed
Mix the first 4 ingredient together. Try to separate the duck skin from meat. Gently with your fingers. Try not to break the skin. Pour some of the soy/dish sauce mixture in between skin and meat then marinade the duck uncovered in the fridge for 24 hours. Turn often.
preheat oven to 425 degrees. Place the ginger and the scallions in the cavity of the duck, then truss the duck. Poke some holes in the skin of the duck the breast and legs. Place the duck breast side down on a rack and roast for 45 minutes, basting every 15 minutes. Turn the duck breast side up and continue roasting until the juices run clear, about 45 minutes.
I made this with only half a duck and it was done in 20 minutes --I think. The skin was black, the juices clear and after it cooled it looked cooked to me. The flavor was great. I was put off by the thick sheets of fat that covered not very much meat. I saved most of the rendered duck fat for later.
I think it would make a good filling for banh mi.
No picture, which is fine. It was pretty ugly.
Friday, October 27, 2006
Pumpkin Doughnuts
upsidedown doughnuts
recipe #116I have about 12 lbs. of cooked pumpkin to use up over the next few weeks so I'm making everything pumpkin. I'm starting with doughnuts.
I guess I never realized that doughnuts were actually deep fried.
This recipe was originally from epicurious.com, but I omitted parts and adjusted it:
PUMPKIN DOUGHNUTS WITH SPICED SUGAR
Spiced sugar
1 cup sugar
4 teaspoons ground cinnamon
2 teaspoons ground nutmeg
Doughnuts
3 1/2 cups all purpose flour
4 teaspoons baking powder
1 teaspoon salt
1 teaspoon ground cinnamon
1/2 teaspoon ground ginger
1/2 teaspoon baking soda
1/4 teaspoon ground nutmeg
1/8 teaspoon ground cloves
1 cup sugar
3 tablespoons unsalted butter, room temperature
1 large egg
2 large egg yolks
1 teaspoon vanilla extract
1/2 cup plus 1 tablespoon buttermilk
1 cup canned pure pumpkin
Canola oil (for deep-frying)
For spiced sugar:
Whisk all ingredients in medium bowl to blend.
For doughnuts:
Whisk first 8 ingredients in medium bowl to blend. Using electric mixer, beat sugar and butter in large bowl until blended (mixture will be grainy). Beat in egg, then yolks and vanilla. Gradually beat in buttermilk; beat in pumpkin in 4 additions. Using rubber spatula, fold in dry ingredients in 4 additions, blending gently after each addition. Cover with plastic; chill 3 hours.
Sprinkle 2 rimmed baking sheets lightly with flour. Press out 1/3 of dough on floured surface to 1/2- to 2/3-inch thickness. Using 2 1/2-inch-diameter round cutter, cut out dough rounds. Arrange on sheets. Repeat with remaining dough in 2 more batches. Gather dough scraps. Press out dough and cut out more dough rounds until all dough is used.
Using 1-inch-diameter round cutter, cut out center of each dough round to make doughnuts and doughnut holes.
Line 2 baking sheets with several layers of paper towels. Pour oil into large deep skillet to depth of 1 1/2 inches. Attach deep-fry thermometer and heat oil to 365°F to 370°F. Fry doughnut holes in 2 batches until golden brown, turning occasionally, about 2 minutes. Using slotted spoon, transfer to paper towels to drain. Fry doughnuts, 3 or 4 at a time, until golden brown, adjusting heat to maintain temperature, about 1 minute per side. Using slotted spoon, transfer doughnuts to paper towels to drain. Cool.
Makes about 12 doughnuts and 12 doughnut holes.
I used a large drinking glass as the 2.5 inch cookie cutter and a shot glass to cut out the hole.
When I put the batter in 370 degree oil I found that the outside burned in about 20 seconds and the inside remained completely uncooked. When I brought the oil down to about 275 I was able to keep the doughnuts cooking for long enough to cook them through. I was worried that at that temp. they would be really greasy, but they were fine. Maybe my deep fat thermometer is off.
Thursday, October 26, 2006
Sandwich of Shame
Bacon at breakfast made me so happy, and Joy of Cooking from the 70s so interesting and full of such great retro food I thought I would make a good lunch from it.
That is when I found the Sandwiches of Shame.
I could only bring myself to make one of them, but I will post both shocking recipes.
The first is innocently named:
Peanut Butter and Tomato Sandwich *
Preheat broiler
Toast on one side:
a slice of bread
Spread the untoasted side with:
peanut butter
mixed with:
Chopped cooked Bacon
Bacon Drippings
You may top this with:
A thick slice of tomato
Season the tomato with:
1/4 teaspoon of brown sugar
salt and paprika
Put the sandwich under the broiler for 2-3 minutes.
Then, you are supposed to eat it. . . which I did. . . and . . . I . . . liked. . . it. . . .
If I were drunk I would have loved it so much I would have sat down and written a strongly worded thank you letter to Irma Rombauer and fallen asleep at the computer before I was finished.
My son liked it too, but he will happily drink his own bathwater, given the chance.
* Just so you know I made it will all organic ingredients on whole grain bread with tons of omega-3 to make myself feel less gross.
This sandwich is even more shocking, simply called:
Peanut Butter and Bacon Sandwich
Combine:
3/4 cup peanut butter
1/4 cup mayonnaise
1/4 teaspoon salt
2 tablespoons pickle relish
1/4 cup minced bacon
Toast on one side
4 slices of bread
Spread the untoasted side with 'mixture'. Broil the sandwiches until the tops are brown. Slice them diagonally.
Irma suggest to, "try this combination on the unconverted." Ha!
I would try this as a closed sandwich, then deep fried. But again, only if I'd been drinking.
Baked Eggs in Bacon Rings
Another great recipe from my 1971 edition of Joy of Cooking. I've never baked eggs before, so I thought I would give it a shot.
Baked Eggs in Bacon Rings
slightly cook bacon in a pan or microwave- cook it more if you like very well done bacon
grease muffin tin with bacon fat
line the sides of muffin tins with bacon
crack and egg and gently drop it into the bacon ring
top with salt, pepper and paprika
cook for 10 minutes at 325 degrees
When done let them rest for a couple minutes then gently place them on a toast round--or as Joy of Cooking suggests, a pineapple ring.
Good with hot sauce.
2 of these baked eggs on toast is a serving.
I love these. They are so easy and take no time. Things with bacon seldom disappoint me. I'm going to go thru all the Joy of Cooking breakfast egg recipes.
Wednesday, October 25, 2006
A Requiem for my Blenders
Today, I finally burned out my 10+yo. hand blender while making mayonnaise. Although I never used it much before stated this project, I did pack it and move it with me to at least 5 different apartments. It will be missed. Sadder still, its demise comes less than 24 hours after my daughter dropped my blender on the kitchen floor taking a huge jagged chunk out of the top of it.
Long story. . . I had to use my 16 oz. baby food maker/food processor to blend the cauliflower soup. Huge mess. No more homemade mayo either.
I made the soup because I had never used white truffle oil before. It was also the only cauliflower soup that wasn't heavy on the milk fat.
Both of these are from Epicurious.com, but I modified the sandwich.
Cauliflower Soup with Truffle Oil
2 tablespoons (1/4 stick) butter
1 large onion, finely chopped
1 pound cauliflower florets (about 5 cups)
2 14 1/2-ounce cans low-salt chicken broth
1 teaspoon white truffle oil
Melt butter in heavy large pot over medium heat. Add onion and sauté until tender, about 8 minutes. Add cauliflower and sauté 2 minutes. Add broth. Cover and simmer until cauliflower is tender, about 25 minutes.
Working in batches, transfer soup to blender and purée until smooth. Return soup to pot. (Soup can be prepared 1 day ahead. Cool slightly. Cover and refrigerate.) Bring soup to simmer. Season to taste with salt and pepper.
Ladle soup into bowls. Drizzle truffle oil over.
Serves 6 as a first-course.
Grilled Cheddar and Fennel Sandwich
2 tablespoons finely chopped shallot
2 teaspoons curry powder (hot)
butter
1/2 cup mayonnaise
1 tablespoon fresh lemon juice
1 baguette
1 1/2 tablespoons unsalted butter, softened
1/2 lb Grafton Cheddar
1/4 cup very thinly sliced fennel bulb
Cook shallot and curry powder in oil in a 12-inch heavy nonstick skillet over moderate heat, stirring, 2 minutes, then transfer to a small bowl and stir in mayonnaise and lemon juice. Wipe skillet clean and set aside.
Cut 16 (1/4-inch-thick) diagonal slices (about 6 inches long) from baguette. Spread 1 side of each slice with butter, then turn over and spread opposite side with curry mayonnaise. Cut cheese into thin slices no wider than bread slices. Divide cheese among 8 slices of bread, then top with fennel and remaining slices of bread, buttered sides up.
Heat skillet over moderate heat until hot, then cook sandwiches in 2 batches, turning over once and pressing occasionally, until browned and cheese is melted, about 7 minutes per batch.
Makes 4 servings.
If I make this sandwich again I'm going to use major grey's or mango chutney instead of the curry mayonnaise.
Serious Chocolate Ice Cream with Whole Coffee Beans
recipe #110
I was looking thru an ice cream cookbook from the 70s that my mother had and I found a recipe for coffee bean ice cream. I was really looking forward to trying it out until I read that the coffee beans soak overnight and then are strained out. The beans are tossed. I wanted ice cream with beans in, so I made this:
Serious Chocolate with Whole Coffee Beans Ice Cream:
1 c. sugar
1 c. water
handful of coffee beans
1 c. quality cocoa powder (I used some stuff I brought back from France last year)
2 egg yolks
2 c. heavy cream, whipped
milk if you need to thin it out a bit while stirring.
1. heat the sugar and water, when it starts to boil, throw in the coffee beans and boil for 2 minutes
2. remove from heat and add cocoa. blend. Add whole milk if you need to thin it a bit.
3. Add egg yolks and blend.
4. Allow to cool to room temp or colder. I sat mine on my fire escape in 40 degree weather for 30 minutes.
5. Fold in whipped heavy cream
6. Throw it in an ice cream maker for 20 minutes.
Serious ice cream. Do not eat if you want to sleep. Do not feed to children. . . or at least not children that you have to supervise.
If the crunching down on a whole coffee bean in your ice cream sounds bad, toss the beans in a grinder for 1 or 2 seconds. It will still give you some texture.
Tuesday, October 24, 2006
Nockerln aka Austrian Pancakes
recipe #109
I was unaware of these all egg pancakes before this morning. I served them with the all popular blueberry sauce. These pancakes can also be made savory.
This recipe is from The Joy of Cooking 1971 edition:
Nockerln
Melt 1 tablespoon of butter into a 10 inch pan
butter should be hot when the pancake mixture is added to it.
Beat until very light:
4 egg yolks
2-4 tbs. sugar
add:
1/8-1/4 tsp. vanilla
Whip until stiff:
4-6 egg whites
Fold the yolk mixture into the egg whites. Heap the souffle into the hot skillet by the spoonful. Allow 5 minutes total cooking time. Brown one side, turn over and brown the other side. Center should still be very soft.
serves 2 or 3.
Do not attempt these on a cast iron griddle or pan. They end up looking like this:
Monday, October 23, 2006
Homemade Bánh mì
recipe #108
I really cannot believe that I have never had a Bánh mì before last Thursday. I feel somehow more complete now.
Today I made not a bad substitute for the real thing. This one was with chicken (as the recipe called for). Next time I will substitute a pork chop that I pound to about 1/4-1/8 of an inch thick. I also will not skimp on the mayo.
I modified this recipe but it is originally from epicurious.com:
Bánh mì
Marinated carrots
3/4 cup sugar
3/4 cup distilled white vinegar
1/4 teaspoon (rounded) salt
6 cups shredded peeled carrots
Sandwiches
1/4 cup soy sauce
6 garlic cloves, minced
4 shallots, chopped
2 tablespoons fish sauce (nam pla or nuoc nam)
2 tablespoons oyster sauce
1 tablespoon sugar
2 teaspoons five-spice powder
2 whole star anise ground in spice mill or crushed to a rough powder
6 large skinless boneless chicken breasts pounded to 1/4-1/8 inch
or
pork chops bone removed and pounded to 1/4-1/8 inch
6 6-inch-long pieces baguette, split lengthwise, some of soft centers removed
Mayonnaise
1 English hothouse cucumber, cut into 6-inch-long 1/4-inch-thick slices
1/2 red onion, halved through stem, thinly sliced crosswise, rinsed, drained well
12 fresh cilantro sprigs
2 jalapeño chiles, thinly sliced crosswise
For carrots:
Whisk first 3 ingredients in large bowl until dissolved. Add carrots; toss to coat. Let stand at room temperature 2 hours. (Can be prepared 5 days ahead. Cover and chill.) Drain well.
For sandwiches:
Mix first 8 ingredients in 13x9x2-inch baking dish. Add chicken or pork; turn to coat. Let marinate at room temperature 1 hour, turning often.
Broil cut sides of bread until lightly toasted. Spread mayonnaise on bottom half of baguette pieces. Top with cucumber slices. Top each with 1 chicken thigh, drained daikon and carrots, then onion slices and cilantro sprigs. Sprinkle with jalapeño slices, soy sauce, and ground black pepper. Place top baguette piece over, pressing to compact, and serve immediately.
Makes 6.
I made this sandwich after having a few really disappointing Bánh mì experiences on Brooklyn over the weekend. I went to 2 different Bánh mì shops. One was fine, the other was terrible. I tried a grilled pork, a shredded pork, a BBQ pork and a standard pork roll pate version. The shredded I took a bite of and gave up on. I'm not sure what was mixed on with the pork. But it was some sort of intestine or organ I just didn't feel up to.
The grilled one was terrific.
Both those were from Ba Xuyen at 4222 8th ave in Brooklyn. It was a nice shop, the women behind the counter were helpful and friendly and they make a mean thai iced bubble tea. Next we swung by Thanh Đa Inc. II at 5624B 8th Avenue. Small shop, kind of mean guy behind the counter. We get sandwiches and start on the long long drive upstate. 2 hours in I get hungry and try the #1 aka classic Bánh mì. I ate 1/4 of it before I was overwhelmed by mayonnaise (and I love mayonnaise). I had to put it down. 45 minutes later I still had the ever more disgusting aftertaste of bad Bánh mì lingering. My sister had to lie down for a while after she ate hers. Avoid Thanh Đa Inc.
Labels:
chicken,
good,
pickled things,
pork,
sandwich,
vietnamese
Sunday, October 22, 2006
Cold Weather Dinner
recipe # 105, 106, 107
I'm going to make cold weather & winter food with wild abandon for the next month and a half. As of December 7th we are pulling up stakes and leaving for LA. After that I doubt I'll see another northeastern winter for a while. Kind of sad.
So for now it is all roasting, squash, roots vegetables, Brussels spouts, poultry, stews, soups, breads, mushrooms, baked desserts. . . .
I learned how to truss a chicken before making the chicken recipe. There is a clear explanation of how to do it here.
This one is From Bouchon by Thomas Keller:
Mon Poulet Rôti
One 2- to 3-pound farm-raised chicken
Kosher salt and freshly ground black pepper
2 teaspoons minced thyme (optional)
Unsalted butter
Dijon mustard
Preheat the oven to 450°F. Rinse the chicken, then dry it very well with paper towels, inside and out. The less it steams, the drier the heat, the better.
Salt and pepper the cavity, then truss the bird. Trussing is not difficult, and if you roast chicken often, it's a good technique to feel comfortable with. When you truss a bird, the wings and legs stay close to the body; the ends of the drumsticks cover the top of the breast and keep it from drying out. Trussing helps the chicken to cook evenly, and it also makes for a more beautiful roasted bird.
Now, salt the chicken — I like to rain the salt over the bird so that it has a nice uniform coating that will result in a crisp, salty, flavorful skin (about 1 tablespoon). When it's cooked, you should still be able to make out the salt baked onto the crisp skin. Season to taste with pepper.
Place the chicken in a sauté pan or roasting pan and, when the oven is up to temperature, put the chicken in the oven. I leave it alone — I don't baste it, I don't add butter; you can if you wish, but I feel this creates steam, which I don't want. Roast it until it's done, 50 to 60 minutes. Remove it from the oven and add the thyme, if using, to the pan. Baste the chicken with the juices and thyme and let it rest for 15 minutes on a cutting board.
Remove the twine. Separate the middle wing joint and eat that immediately. Remove the legs and thighs. I like to take off the backbone and eat one of the oysters, the two succulent morsels of meat embedded here, and give the other to the person I'm cooking with. But I take the chicken butt for myself. I could never understand why my brothers always fought over that triangular tip — until one day I got the crispy, juicy fat myself. These are the cook's rewards. Cut the breast down the middle and serve it on the bone, with one wing joint still attached to each. The preparation is not meant to be superelegant. Slather the meat with fresh butter. Serve with mustard on the side and, if you wish, a simple green salad. You'll start using a knife and fork, but finish with your fingers, because it's so good.
Makes 2 to 4 servings.
This is from Craft of Cooking by Tom Colicchio:
Creamless Cream Corn
10 ears of white corn
5 tablespoons unsalted butter
1 small yellow onion, peeled and diced
Kosher salt and freshly ground black pepper
2 teaspoons roughly chopped fresh tarragon
Shuck half the corn and remove the kernels from the husks. Place the corn in a blender and discard the cobs and husks. Purée the corn with 1/3 cup water. Press the purée through a fine sieve and reserve.
Shuck the remaining corn, cut the kernels from the cobs, and reserve. Melt 2 tablespoons of the butter in a large, high-sided skillet over medium heat. Add the onion, salt, and pepper and cook until the onion begins to soften, about 10 minutes. Add the reserved corn, salt, and 1/2 cup of water. Cook, stirring occasionally, until the corn is almost tender, about 7 minutes.
Meanwhile, transfer the strained corn purée into a double boiler set over barely simmering water. Cook gently, stirring frequently, until the liquid thickens to the consistency of heavy cream, about 3 minutes. Season the purée with salt and pepper. Remove the corn and onion mixture from the heat and stir in the corn cream. Add the tarragon and adjust the seasoning if necessary with salt and pepper.
Serves 6
This is from epicurious.com:
Parsnips and Carrots with Orange Butter Sauce
1 cup water
1/2 pound parsnips, peeled; halved lengthwise, and cut crosswise into 1/4-inch-thick pieces
1/2 pound carrots, halved lengthwise and cut crosswise into 1/4-inch-thick
pieces
1/3 cup fresh orange juice
1/8 teaspoon freshly grated orange zest
1 tablespoon unsalted butter
In a skillet combine the water, the parsnips, the carrots, and salt to taste, simmer the vegetables for 15 minutes, or until they are just tender, and stir in the orange juice. Simmer the mixture for 5 minutes, or until the vegetables are tender, and transfer the vegetables with a slotted spoon to a bowl. Boil the liquid until it is reduced to about 2 tablespoons, remove the skillet from the heat, and stir in the zest and the butter, stirring until the butter is melted. Spoon the sauce over the vegetables.
Serves 2
The Parsnips where fine.
The chicken and the corn were something else all together. I don't think that there is any reason to ever make roast chicken another way. Same with the corn. The corn is amazingly good. I thought it was great before I added the tarragon, but the tarragon put it over the top. I cannot imagine how good it will be when corn is in season.
Thursday, October 19, 2006
Banh Mi Thit Cha and Green Tea Candy
UPDATE: recipes for banh mi here and here.
I found a recipe for a 'vietnamese sandwich' on epicurious.com and was planning on making it later this week. This is what prompted me to order what was called the 'vietnamese sandwich' or banh mi thit cha at lunch today from Nha Trang Palace in Brooklyn Chinatown (good, friendly, fast restaurant). The sandwich was $3.00. It was fantastic. There was a layer of something mayonnaise/pate like on the bottom of the sandwich and the shredded carrots were pickled. I think that the 2 different kinds of meat on it are both pork.
I'm going to try every vietnamese sandwich I can find from now on.
We also got some fantastic greet tea candy that reminds my husband of milk duds.
We are going back for more of both tomorrow.
Tamarind Granita
Today I learned that tamarind is an important ingredient in Worcestershire sauce.
I'm giving my sister, Bronwen credit for this one. It is really good. My daughter actually ate 2 servings of it even though I thought it would be too tart for her. It would be a good cocktail base too. Add some vodka and you've got a nice drink.
Here is the very simple recipe:
Tamarind Granita
1.5 cups of sugar
3 cups of water
1/4 good tamarind concentrate
In a saucepan combine water and sugar, bring to boil then remove from heat. Add tamarind concentrate then cool to room temp. Throw mixture into an ice cream maker for 20-25 minutes than store in the freezer. The mixture will not harden like sorbet.
photos shortly.
And . . .
An interesting article from The Journal of the American Medical Association stating that the health benefits of eating fish out weigh the health risks.
Labels:
hangover cures and booze,
italian,
kids,
sweet,
vegan
Wednesday, October 18, 2006
Szechuan
recipes # 102, 103 & 104
I'm starting Szechuan cuisine, or sichuan or szechwan or 四川菜. Depending on how you spell it. I started very basic.
First, from Sichuan Cooking by Fuchsia Dunlop:
Zhong Dumplings - Zhong Sui Jiao
circular dumpling wrappers
Filling
60 g piece fresh ginger, unpeeled
1 egg
1 tablespoon shaoxing wine
3/4 teaspoon salt
fresh ground black pepper, to taste
450 g ground pork
Dipping sauce
3 tablespoons light soy sauce
2 teaspoons sugar
1 1/2 tablespoons chili oil (the homemade variety, not store bought, see my recipe for hong you, chilli oil)
1 teaspoon sesame oil
2 garlic cloves, crushed and mixed with
2 teaspoons cold water
1. Smash the ginger with the flat side of a cleaver or heavy object and leave to soak for a few minutes in 200ml cold water.
2. Mix the egg, wine and salt and pepper into the pork, then gradually add the ginger-water (discarding the crushed pieces), so it is absorbed by the meat to form a fragrant, floppy paste.
3. Mix the dipping sauce ingredients in a small bowl; always add the garlic at the last minute to make the most of it's flavour and fragrance.
4. Fill each dumpling wrapper wth a good teaspoon of filling, and seal to make a half-moon shape. Seal with a series of little pinches if you want it to look good and authentic! Make sure dumpling skin is sealed so that the filling can't ooze out. Lay the dumplings out seperately on a lightly floured surface.
5. Heat a large pan of water to a vigorous boil over high heat. Throw in a couple of handfuls of dumplings. Stir once to prevent sticking. When the water has returned to the boil, throw in a coffee cupful of cold water. Allow the water to return to the boil and throw in another coffee cupful of cold water. When the water has returned to the boil again, the skins should be glossy and the meat should have cooked through.
6. Remove from pan with a slotted spoon, drain well, and serve hot with dip. Continue cooking the dumplings in batches.
7. FYI - the cold water is added to stop the water from boiling too vigorously and tearin the dumplings apart.
Here is the chili oil recipe that goes with the dumpling recipe.
Hong You
100 g chili flakes or coarsely ground chilies, with seeds
550 ml peanut oil or peanut oil or corn oil
1. Put the chili flakes into a glass preserving jar.
2. Heat the oil over high heat until smoking hot.
3. Remove from the heat and allow to cool for about 10 minutes to 120 - 130 degrees celcius. (I don't have a themometer, I just cool for 10 minutes).
4. Pour onto the chilies, stir once or twice and leave to cool in a shady place. The oil and chilies will fizz and swirl around at first but the chilli flakes will settle as the oil cools. You can use the oil immediately, but the flavour and fragrance will improve after a couple of days.
I boiled the dumplings and then pan fried them until they were just slightly brown. They are much better that way.
For the main course I made:
Sichuan Green Beans
1 lb chinese long beans or regular green beans, cut on the diagonal into 2-inch pieces
1 tablespoon bean sauce (preferably Koon Chun)
2 tablespoons soy sauce (black or mushroom)
2 tablespoons vegetable broth or chicken broth
1 tablespoon dry sherry
1 tablespoon sugar
2 teaspoons cornstarch
1 teaspoon chili paste (to taste)
1 tablespoon sesame oil
3 tablespoons vegetable oil
1. If using regular green beans, steam or parboil them for 5 minutes. (Regular green beans are thicker than Chinese long beans so they take longer to cook). Rinse cut beans in cold water.
2. Combine the bean sauce, soy sauce, sherry, sugar, cornstarch, chili paste, and sesame oil. Add 2 tablespoons cold water.
3. Heat both oils in a wok until smoking. Add beans and stir-fry for 10 minutes or until beans are bright green in color and slightly wrinkled.
4. Add sauce and stir-fry until sauce thickens.
I used the long beans. It's a terrific recipe. Good hot or cold.
Szechuan Sesame Chicken
1 medium egg white
2 teaspoons cornflour
500 g chicken breast fillets, cut into strips
3 tablespoons peanut oil
1 tablespoon sesame seeds
2 teaspoons dark soy sauce
2 teaspoons cider vinegar
2 teaspoons chili sauce
2 teaspoons sesame oil
2 teaspoons sugar
1 tablespoon rice wine
1 teaspoon whole szechuan peppercorns, roasted
2 tablespoons spring onions, trimmed & finely chopped
1. Beat the egg white with the cornflour, pour into a shallow dish and add the chicken strips. Turn to coat, cover with clingfilm and leave in the refrigerator for 20 minutes.
2. Heat a wok, add the peanut oil and when hot, add the chicken pieces and stirfry for 2 minutes or until the chicken turns white. Remove chicken with slotted spoon and drain on absorbent paper. Pour off the oil and reserve 1 tablespoon of oil. Wipe wok clean.
3. Reheat wok, add 1 tablespoon of the peanut oil with the sesame seeds and stirfry for 30 seconds, or until golden. Stir in the dark soy sauce, cider vinegar, chili sauce, sesame oil, sugar, chinese rice wine, Szechuan peppercorns and the spring onions. Bring to boil.
4. Return chicken to wok and stir-fry for 2 minutes, making sure the chicken is coated evenly with the sauce and sesame seeds. Serve immediately, with rice (or mixed salad).
I didn't love this one although other people liked it fine. I think I screwed it up somewhere along the way.
Both of those are from recipe zaar.
maybe photos later
Tuesday, October 17, 2006
Crawfish Bisque & Stuffed Crawfish Heads, interrupted.
crawfish heads, unstuffed.
Crawfish Bisque is, for the most part served with stuffed crawfish heads. I've never stuffed a head or made a bisque so I decided to put the crawfish in my freezer towards this project.
I filled a pot, threw them in a pot and boiled them. This is what it looked like when they were finished cooking:
Red Flag. Disgusting water.
As the recipe directed I then started to remove the meat from the tail and separate the head from the bodies. This went okay for the first 1 or 2. Crawfish are kind of gross. More giant insect than tiny lobster. The 3rd of 4th crawfish I picked out of the pot looked like it had lived at the bottom of a toxic puddle for most of its life. I scrubbed it and the grey scum that covered the bottom of its body came off a bit but it looked like a job for ajax. Tossed that one. Picked up the next, same thing. In fact, about 70% of these guys were partially covered in sludge.
Is this normal?
Was I being paranoid and crawfish phobic when I decided to toss the lot of them? Seriously, if this is normal, I would like to know.
I have eaten plenty of bottom feeders, but never before have I come across one that needed to be scrubbed with ajax.
They came from Freshdirect.
I would really like to stuff some crawfish heads when I find some good ones. Back burner for this recipe until then.
Here is the recipe that I was going to use:
CRAYFISH BISQUE: A CREOLE DISH
(La Cuisine Creole, 1885)
Parboil the fish, pick out the meat, and mince or pound it in a mortar until very fine; it will require about fifty crayfish.
Add to the fish one-third the quantity of bread soaked in milk, and a quarter of a pound of butter, also salt to taste, a bunch of thyme, two leaves of sage, a small piece of garlic and a chopped onion. Mix all well and cook ten minutes, stirring all the time to keep it from growing hard.
Clean the heads of the fish, throw them in strong salt and water for a few minutes and then drain them. Fill each one with the above stuffing, flour them, and fry a light brown.
Set a clean stewpan over a slow fire, put into it three spoonfuls of lard or butter, a slice of ham or bacon, two onions chopped fine; dredge over it enough flour to absorb the grease, then add a pint and a-half of boiling water, or better still, plain beef stock.
Season this with a bunch of thyme, a bay leaf, and salt and pepper to taste.
Let it cook slowly for half an hour, then put the heads of the crayfish in and let them boil fifteen minutes. Serve rice with it.
UPDATE:
My sister, who is a chef, tells me I was being paranoid.
Monday, October 16, 2006
New England Fish Chowder and English Muffins
recipes #100 and 101
It's sweater season here. This is good news food wise. Soups, breads, baking, roasting, squash, apples. . . .
I decided to start with chowder, which I have never made from scratch before.
Last month at the farmers market we bought some fish that I just found at the back/bottom of the freezer. Neither of us could remember quite what it was, but it was white and looked like it would be flaky, so chowder seemed like a good plan for it.
The other thing is that this is recipe #100. 100 recipes have really changed the landscape of my fridge. I no longer have mayo (I can make it myself now!) but I have 6 different kinds of mustard. I always used to have english muffins in my fridge. They were good for breakfast, sandwiches, burgers, the kids loved them. I realized I had no idea how they were made, so, I learned.
This recipe is modified from epicurious.com:
NEW ENGLAND FISH CHOWDER
4 ounces bacon
2 tablespoons unsalted butter
2 medium onions (14 ounces), cut into 3/4-inch dice
6 to 8 sprigs fresh summer savory or thyme, leaves removed and chopped (1 tablespoon)
2 dried bay leaves
2 pounds Yukon Gold, Maine, PEI, or other all-purpose potatoes, peeled and sliced 1/3-inch thick
5 cups Strong Fish Stock, Traditional Fish Stock, Chicken Stock, or water (as a last resort)
1 cup corn kernels
Kosher or sea salt and freshly ground black pepper
3 pounds skinless haddock or cod fillets, preferably over 1 inch thick, pinbones removed
1 1/2 cups heavy cream (or up to 2 cups if desired)
1. Cook bacon in a heavy cast iron pot until crispy. Remove bacon, chop and reserve.
2. Add the butter, onions, savory or thyme, and bay leaves to the pot and sauté, stirring occasionally with a wooden spoon, for about 8 minutes, until the onions and softened but not browned.
3. Add the potatoes, corn and stock. If the stock doesn’t cover the potatoes, add just enough water to cover them. Turn up the heat and bring to a boil, cover, and cook the potatoes vigorously for about 10 minutes, until they are soft on the outside but still firm in the center. If the stock hasn’t thickened lightly, smash a few of the potato slices against the side of the pot and cook for a minute or two longer to release their starch. Reduce the heat to low and season assertively with salt and pepper (you want to almost overseason the chowder at this point to avoid having to stir it much once the fish is added). Add the fish fillets, and reserved baconand cook over low heat for 5 minutes, then remove the pot from the heat and allow the chowder to sit for 10 minutes (the fish will finish cooking during this time).
4. Gently stir in the cream and taste for salt and pepper. If you are not serving the chowder within the hour, let it cool a bit, then refrigerate; cover the chowder after it has chilled completely. Otherwise, let it sit for up to an hour at room temperature, allowing the flavors to meld.
serves 8 as a main course.
I used half whole wheat flour with this recipe:
English Muffins
1 2/3 cup milk
2 1/2 tablespoons butter
1 package active dry yeast
1 heaping tablespoon granulated sugar
1/3 cup warm water
1 large egg
2 teaspoons salt
1 tablespoon vinegar
5 cups unbleached flour
2 tsp. salt
Cornmeal or bread crumbs
1. Heat the milk and melt the butter in it. Cool.
2. Combine the yeast, water, and sugar. Allow to proof for a few minutes.
3. Combine the cooled milk mixture with the yeast mixture in large bowl. Add the egg, salt, and vinegar, along with half the flour and mix at medium speed for about 5 minutes. Add in remaining flour and mix well. The mixture will be sticky. Cover and allow to rise in draft-free area for 1 hour.
4. Pour cornmeal or bread crumbs into a bowl. Grease two baking sheets. Take approximately 1/2 cup of dough into your hand and form a ball. Flatten and place in cornmeal, turning once. Place muffin on the greased cookie sheet and flatten to a 3-inch circle. Allow muffins to rise for about 8 minutes.
5. Heat a griddle or skillet over medium-low heat. Place the muffins on the griddle and cook 7 minutes on each side. Allow to cool completely.
The english muffins turned out a bit less nook and crannies full, but they were good with the chowder and with butter and jam. I think I'll make wider, thinner ones next time.
Sunday, October 15, 2006
FreshDirect recipes
I haven't used freshdirect since fairway opened in Brooklyn, but they have a new feature now that is interesting. You can browse thru recipes (some from French Laundry all the way thru to Beer Can Chicken) and once you pick one, FreshDirect will automatically add all ingrediance required for the recipe to your order. Fun. Good recipes too.
You can check it out here.
Saturday, October 14, 2006
Cheese Blintz with Blueberry Sauce
recipe #99
I have never had a blintz before today. Infact, I wasn't even quite sure what they were. So today I made them. And they were gooood.
I used a recipe from epicurious, which after some research seemed to be pretty authentic:
CHEESE BLINTZES WITH BLUEBERRY SAUCE
For crêpes
1 1/2 cups whole milk
6 large eggs
1 1/2 cups all-purpose flour
3/8 teaspoon salt
2 tablespoons butter, melted
For filling
1 1/2 cups (12 ounces) farmer cheese
1/2 cup (4 ounces) large-curd cottage cheese (4% milk fat)
1 egg yolk
1 tablespoon unsalted butter, melted
1 tablespoon sugar
pinch salt
For sauce
4 1/2 cups fresh blueberries (from 5 half-pint containers, picked over)
3/4 cup sugar
1 1/2 teaspoons cornstarch
For frying
4 tablespoons butter
Special equipment
Iron skillet or crêpe pan
Flexible metal or plastic spatula
Make crêpes
In blender, combine milk and eggs. Add flour and salt and blend at low speed until smooth, less than 1 minute. Let batter stand 1/2 hour.
Have ready large plate or platter. Place skillet over moderately high heat, brush lightly with some melted butter, and heat until butter just begins to smoke. Pour 1/4 to 1/3 cup batter into pan, tilting to spread into thin, even layer. Cook until crêpe begins to "blister," edges curl slightly away from skillet, and underside is lightly browned, about 1 to 2 minutes. Use flexible spatula to flip crêpe out of skillet and onto plate, cooked side up.
Repeat with remaining batter, brushing skillet lightly with melted butter before cooking each crêpe. Stack crêpes, cooked side down, on plate and let cool.
Make filling
In large bowl, mash together farmer and cottage cheeses until blended. Add egg yolk, melted butter, sugar, and salt, and mix until combined.
Place 1 crêpe, cooked side up, on a plate. Place 2 tablespoons filling in center, and fold up bottom to cover filling. Fold down top, then flip over and fold in sides. Flip over again and place on a large plate. Repeat with remaining crêpes and filling. (Can be made up to 1 day ahead; cover and chill until ready to fry.)
Make sauce
In large saucepan, combine 3 cups blueberries, sugar, and cornstarch. Set over moderately low heat and stir gently until sugar dissolves. Raise heat to moderately high and boil, stirring occasionally, 3 minutes. Remove from heat and gently stir in remaining blueberries.
Fry blintzes
Heat 1 tablespoon butter in iron skillet over moderately high heat. Add 3 blintzes and fry until golden brown on both sides, about 1 to 2 minutes per side. Repeat with remaining blintzes. Serve hot with sauce.
Makes 12 blintzes
Basically it seems that a blintz is just a crepe that is filled with something and served with or without a sauce. I am going to try a savory blintz, maybe with potatoes and mushrooms next. They are very easy and very much a winter/fall comfort food.
Friday, October 13, 2006
Raisin & Almond Stuffed Kabobs aka Lame Kabobs
This officially ends my month + stint of cooking from Classic Indian Cooking. These kabobs were B.A.D. They may have had legs if I doubled the spices and grilled them and stuffed them with something else. Of course then it would be a whole other recipe. I made a 'relish' that she suggested go with it which is basically just raw soaked onions, lemon juice and green chilies.
Tiny Burger and The Ambien Cookbook
I found 2 wonderful things today on boingboing
The first is this cute little thing:
this is actual food
And The Ambien Cookbook, beacause I look cooking with mind altering substances. And ambien is some wacky stuff.
Thursday, October 12, 2006
Wednesday, October 11, 2006
Carrot Ice Cream with Almonds
recipe #97
Yesterday I had one of those must-get-rid-of-everything-in-the-fridge days and carrots were one of the things about to go bad. I had made an Indian carrot pudding last week that I though might translate well into an ice cream if adjusted.
Here is what went into it:
Carrot Ice Cream with Almonds
2 cups whole milk
2 packed cups grated carrots (must be grated)
1/2 c. sugar
handful of blanched almond slivers (unsalted)
1/2 tsp. ground cardamom
1/3 c. heavy cream
Boil milk for 10 minutes. Add carrots and boil for another 15 minutes. Add Almonds, sugar and cardamom. Cook for 5 minutes. Add cream. Stir. Cool to room temperature or cooler. Prepare in ice cream maker.
This stuff is very very tasty and lovely. Do not skip the almonds, they add a nice texture.
Tuesday, October 10, 2006
Hard Cider
recipe #96
I went apple picking with my sister last week with the sole purpose of getting a boat load of apples I could turn into booze. I peeled them, ran them thru the juicer I have used maybe only twice in the 5 years I have owned it and then poured it in a seltzer bottle.
I read a few different websites that tell you how to make hard cider. Some are very picky and specific with wine making ingredient. others just say shove it in a cool dark place semi-covered for a month or so. I choose the middle route. I added some sugar, a bit of yeast and covered with plastic with only a tiny hole poked in the top. I'm going to try it in 3 weeks.
UPDATE:
When I woke up this morning the cider had done this:
wrapping up my Indian cooking phase
recipes #89 - 95
I'm getting ready to stop with the Indian cooking already. Here are the last few dishes that I made. All from Classic Indian Cooking by Julie Sahni.
This was my lunch of leftover Saag Gosht (Lamb in Spinach Sauce). Chaunk Gobhi aur Sem Sambaar (Spicy Brussel Spout Stew with green bean and lentils) and some lime pickle on the side.
The bhartha (spicy smoked eggplant) was pretty good and very easy to make.
Same with the Aloo Mirch (tumeric potatoes with peppers). The recipe called for green peppers, but I had orange ones that I think were much prettier and taste better too. This is good with riata.
I also made mysore rasam (mysore spicy lentil broth), khatte channe (chick peas in tamarind sauce) and a terrible cornish hen with apricot sauce I'm not even going to go look up the indian name for. To be avoided at all costs. More pictures as I re-heat.
Monday, October 09, 2006
Aquavit Gravlax
gravlax and mustard dill sauce from the Aquavit cookbook with is filled with wonderful foods
recipe #88This is an amazingly simple thing to do. It is also sort of like magic as you can turn a $15-20 piece of fish into a $50-60 piece of delicious fish.
Here is the basic recipe from the Aquavit cookbook:
Gravlax
2.5-3 lb. filet if salmon w/ skin on one side- as fresh as possible
1/2 c. salt
1 c. sugar
1 tsp. white pepper
large amount of fresh dill chopped
wash and pat dry fish. Mix together salt, sugar and pepper. sprinkle skin side of fish with mixture. Place fish in large glass dish and pour the rest of the salt/sugar mixture over the fish, covering it. Then, spinkle mixture with an even coat of chopped dill. Cover and leave in a cool place for 6 hr. After 6 hrs. cover well and leave in fridge for 36 hrs. After 36 hrs., scrape off mixture and dill, slice up and serve.
Good. Very good. It is sort of odd because about 12 hours into the curing process the fish is basically sittingin a huge pool of liquid. This worried me the first time I did it, but it is normal, just pour it off.
Eating at Playa del Fuego
Just a couple of shots from Playa del Fuego this weekend.
the only thing Lola ate the whole time were her candy necklaces
This is pretty much the only thing that I made there that was new. It is called aloo chat and is basically an indian mint potato salad. Doesn't sound awesome but it is. Easy too. Basically it is just boiled and peeled potatoes, chopped mint, chopped cucmbers, lemon juice (or mango powder), salt and roasted crushed cumin and corriander seeds.
recipe #87
I used tiny purple potatoes I found at the farmers market in Troy NY. I think that purple foods are the New Black.
recipe #87
I used tiny purple potatoes I found at the farmers market in Troy NY. I think that purple foods are the New Black.
Subscribe to:
Posts (Atom)