Sunday, September 30, 2007

Eggy Crumpets


2 large eggs
Sea Salt and freshly ground black pepper
1 fresh red chilli, deseeded and very finely chopped
6 rashers of good quality smoked bacon
Olive oil
4 round crumpets
Brown sauce or maple syrup to serve

Whisk the eggs together with some salt and pepper and most of the chopped chilli. Heat a frying pan over medium heat and fry the bacon in a tiny amount of olive oil. Meanwhile, really push the crumpets into the egg mixture, turn them over a few times so they can soak it all up like a sponge. When the bacon is done, push it to one side and tilt the pan so the fat runs into the middle. Add the crumpets to the pan and fry for a few minutes till golden, turn over and fry on the other side.
Serve topped with the bacon and some brown sauce or maple syrup. You can also sprinkle over the extra chilli pepper if you want to.

I made these, and then made them again right away because my husband missed them the first time around. They are so simple and easy and good and satisfying. They don’t take any longer then frying an egg, so they are way up there with the fastest of breakfast foods, and the chilli gives a great little kick to get you waking up in the morning.

The recipe says to serve it with either brown sauce or maple syrup, I went with the syrup because I can’t pass up an opportunity to eat bacon with syrup. Good stuff.

If you are not in the UK, then you probably can’t get crumpets. I would think you could do a similar thing with English Muffins (which by the way are American and not English). It won’t be the same because it won’t have the substantial heft and fabulous chewiness that a crumpet has, but it does have the nooks and crannies that are similar to the holes in the crumpet for soaking stuff up. It’s worth a shot.

This is from the new Jamie book…Jamie at Home. It’s new, it’s Jamie Oliver, what can I possibly say, except that I love it so very much already. There will be much Jamie cooking in the next few weeks. Buy this book, buy all of his books, he rocks!

Monday, September 24, 2007

Baked Egg Cups

I made Cookbad’s Baked egg cups . the other day...


They have been on the blog before, and I have eaten them before, but this is the first time I have made them. I’m not much of a breakfast maker, but I have guests at the moment who are big fans of a morning meal, and I’ve been meaning to learn more about it anyway, so this was my jumping off point.

These were really easy to make, and the cool thing is that you can get them totally ready the night before, and then just cover the muffin tin and leave it in the fridge overnight. Doing it that way saves you all the effort in the morning. You could scramble an egg in much less time then it takes to preheat your oven and put these in, but you would have to have an active part in scrambling an egg. For this you just wake up, turn on your oven, brush your teeth and then pop the tray in, and like magic you have beautiful little tasty fun breakfast cups of goodness.

I will definitely do this again.

One thing, mine had to go in for an extra five minutes, I think it has to do with the British bacon rashers being bigger then American Bacon. Check them in ten, but be ready for fifteen.

Wednesday, September 12, 2007

Perfect Roast Potatoes


Choose a floury variety of potato, such as a maris piper, Cara, or King Edward, and cut fairly small, egg size, if you like. Parboil in gently boiling salted water for 8 minutes – stop before the potatoes are cooked right through. Drain and leave to cool completely, then scratch roughly with a fork and season with a little fine salt.
Only roast the potatoes around the joint if there is plenty of fat in the tin – at least 5mm – and plenty of room. Better to preheat the oil (goose fat or lard if you have them, sunflower or groundnut oil if you don’t) in a separate tin, adding any fat from the roasting tin just before the spuds go in. Do not add the potatoes till the oil is sizzling hot. Baste or turn them carefully as soon as they go in the tin so that they are lightly coated with oil from the start.
Roast for the last 45 min of your joints cooking time, turning at least once. If they look as if they could use a bit more browning/crisping, leave them in after the joint has come out to rest and whack up the heat (for the Yorkshire puddings). Drain well and keep in a warm oven, uncovered and not too piled on top of each other. Season again with salt and pepper before serving.


So as it turns out, there are only 2 secrets to making the perfect roast potatoes. The first, is fuzzing up the outside. This recipe has you actually scratch them with a fork, others that I have seen have you bang them around in a pot till the edges get messed up a bit. The important thing is that the surface area be increased and made ragged, because that allows for maximum crispiness.
The second secret is, unfortunately, cooking them in goose fat. I hoped this was not the case, and I tried doing the same thing, but with oil instead. I have to admit, the goose fat potatoes wiped the floor with the healthier oil roasted ones. I’m not saying you should use goose fat in cooking all the time, but you gotta try it at least once, just to see the difference.
I got this recipe from The River Cottage Meat Book. Great book, great recipe, great potatoes.

Tortilla Soup


1 large onion, cut into chunks
3 large tomatoes
3 garlic cloves, peeled
4tbsp olive oil
1 litre/1&3/4 pints chicken stock
Salt and freshly ground black pepper
6x1day old tortillas
Oil for shallow frying
2 fresh red or green chillies, seeded and chopped
To Serve:
Chopped avocado
Sour cream
Lime wedges

Put the onion chunks, tomatoes, and garlic cloves in a baking dish and roast in a preheated oven at 180/350 for 15-20 min, until the vegetables are soft and the tomato skins are beginning to look black and charred. Skin the tomatoes and puree with onions and garlic in a blender or food processor.
Heat 2 tbsp of the oil and sauté the puree mixture for a few minutes. Simmer until it is thick and reduced. Add the chicken stock and bring to a boil. Reduce the heat, season with salt and pepper and simmer, covered for 15-20 minutes.
Cut the tortillas into thin strips and shallow fry in some oil until golden brown. Drain on some absorbent kitchen paper and then add to the soup. Simmer gently for a further 5 min.
Fry the chillies in the remaining oil in a small frying pan until crisp. Serve the soup garnished with the fried chilli, some of the chopped avocado, sour cream and lime wedges.

This was from a book called Essential Mexican Cookery . This is a good basic beginner book for Mexican cooking. The recipes don’t call for any ingredients that are terribly hard to find, and I get the feeling that it is more of an overview of Mexican cooking. If you’ve never tried Mexican cooking before, this book is definitely non-threatening. Also, I have really enjoyed the dishes I’ve made from it. I don’t know if they are the most authentic or not, but they have been consistently tasty.

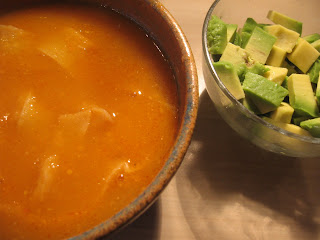
This soup was lovely. The crispy bits of tortilla soak up all the soup and make it feel really hearty, and the roasting of the vegetables gives it a wonderful depth of flavor. I totally loved this. I had tortilla soup in a restaurant once and it was more of a clear broth type soup, where as this is more of a thick hearty one. I think both work for me.

Treacle Sponge

oops...


29/08 - 2655
3tbsp golden syrup, plus 3-4 extra to serve
175g self raising flour
1 rounded tsp baking powder
175g very soft butter
3 large eggs
175g soft light brown sugar
1tbsp black treacle

Butter a 1.2 litre pudding basin well. Cut a double thickness of kitchen foil measuring approximately 30x40 cm.
Grease a tbsp and measure the 3tbsp golden syrup into the pudding basin.
Sift the flour and baking powder into a large mixing bowl and add the soft butter, eggs, sugar, and black treacle. Using an electric hand whisk, beat the mixture for about 2 min or until it has thoroughly blended. Spoon the mixture into the basin and use the back of a spoon to level the top.
Cover the basin with the foil, making a pleat in the center. Pull the foil down the outside of the basin and tie in place around the rim with string, taking the string over the top and tying it on the other side to make a handle for easy lifting. Trim off the excess foil all the way around.
Place the pudding in a steamer fitted over the saucepan of boiling water and steam the pudding for 2 hours, checking the water level half way through.
To serve, loosen the pudding all around using a palette knife, invert it onto a warmed plate, and pour the extra syrup over the top before taking it to the table. Serve with custard or ice cream.

This was my first attempt at a real traditional pudding (I tried a sort of modern specialty one before). As you can see from the picture, it gave me a bit of trouble.

For those of you who aren’t familiar with British puddings (sponges), they are cakes, but instead of being baked, they are steamed. They make special bowls for steaming them (pudding basins), they look like Tupperware, just a bowl with a fitted lid. One very important tip is that you cannot put your pudding basin in the dishwasher. They all say they are dishwasher safe, but still, they will warp just enough that, though you won’t see a difference, the lid won’t fit anymore.

Making this was no problem at all. The trouble for me, is my lack of proficiency with the lids, and my inability to remove a cake from a tin without damaging it. With regular cakes I use baking paper and spring-form pans to compensate, but with the pudding basin, I just had to butcher the cake a little taking it out. I did butter it very thoroughly, but I think I was a bit hesitant and sloppy with the palette knife. As for the lid, It was actually fine, I just wasn’t sure it would be. I didn’t make a handle with string, I just took it out of the pot with pot holders.

Next time (because there will be a next time), I will make the handle, I will be confident about the lid, and I will be strong and efficient with the palette knife. I believe that after having this as a test run, it would not be too hard to work out the kinks and become a great pudding maker.

This was really tasty, though a bit over the top sweet. It tasted better then it looked.

Chinese Chicken in the pot


1 chicken
5 star anise
450ml/3/4 pint water

Seasoning:
225ml dark soy sauce
225ml rice wine, or dry sherry
150g rock sugar, or 75g Demerara sugar

Using a cleaver or meat axe, chop the chicken into bite sized pieces and place in a bowl.

Blend the seasoning ingredients to make a rich marinade and pour 10 tbsp over the chicken. Marinate for 1 hour.
Place the chicken in it’s marinade in a large flame-proof casserole with the star anise, water and the remaining marinade. Bring to a boil and then cover and simmer gently for 45-60 minutes, or until chicken is tender.

This is similar to the Pork Belly Hot Pot recipe that I made awhile back, but with a much shorter cooking time. I preferred the pork, but this is a good compromise if you don’t have all day to cook.

Chicken with sesame oil and honey


1 chicken (about 1.4kg)
2tbsp veg oil
125ml water
2 tbsp sesame oil
Seasoning:
4tbsp light soy sauce
3tbsp clear honey
1tbsp rice wine or dry sherry
1/2 tsp ground ginger
1 tsp salt

Using a cleaver or meat axe, cut the chicken into bite sized pieces.
Mix the seasoning ingredients and add the chicken, marinate for 1 hour.
Drain the chicken reserving the marinade. Heat the oil in a wok and add the chicken pieces. Stir fry over a medium heat till the chicken begins to brown. Add the water and bring to a boil. Stir in the reserved marinade and the sesame oil and simmer gently for 40 minutes.


I marinated it for 2 hours, because my timing worked out that way, and that was fine. Also, I don’t have a meat cleaver, so what I did was use a decent knife to cut part way through the chicken pieces, down to the bone, then I held the knife still and whacked the back of it with a rolling pin to cut through the bones. This worked, though not as well as a meat cleaver would have, and it did do some damage to my rolling pin (but didn’t render it useless, so I kept on with it anyway). If you have fabulous knives that you love, I wouldn’t try this trick, as I imaging it’s pretty tough on the knife. Still, it did what I needed it too.

This recipe was dead easy to make, and really tasty. It’s not overwhelmingly flavored like what you get at a Chinese take away place, it’s much more subtle. I plan to make a noodle stir fry with the left over chicken and sauce.

Good stuff.

Abalone Mushrooms and green vegetables in oyster sauce


3-4 green stemmed flat cabbages (Bok Choy)
275g abalone mushrooms
4tbsp corn oil
125ml clear soup stock
1tbsp cornflour, mixed with 1&1/2 tbsp water
1/2 tsp sesame oil
Seasoning:
1tsp salt
1tbsp oyster sauce
1&1/2 tbsp sugar

Clean the cabbages and cut them in half. Cut off and discard the stems from the mushrooms. Wash and slice into large pieces.
Blanch the cabbage and the mushrooms separately in boiling salted water for 1 min. Drain and plunge into clod water. Leave to cool, then drain again.
Heat the oil in a wok and stir fry the cabbage and mushrooms. Add the seasoning and the soup stock and bring to a boil. Stir in the cornflour mixture to thicken the sauce. Just before serving, stir in the sesame oil.

I used a mix of straw mushrooms, and abalone mushrooms. This is just a veg side dish, but it’s a really tasty one. I’m a huge fan of Bok Choy, and I love mushrooms too, so this is going to come in handy.

Stewed Beef with carrots


700g braising beef
2-3 carrots
1 piece of dried orange peel, soaked
1 spring onion, chopped
1tbsp grated fresh root ginger
2 star anise
450ml water
Seasoning
3tbsp soy sauce
1/4 tsp salt
1tbsp rice wine or dry sherry

Cut the beef into 2 inch cubes. Place in boiling water and scald for 1 minute, then remove with a slotted spoon and rinse again.
Peel the carrots and cut them into chunks. Drain and rinse the dried orange peel.
Place all of the ingredients, including the seasoning ingredients, in a saucepan with the water, cover and bring to a boil. Reduce the heat and simmer for 1 to 1.5 hours or until the meat is tender. Add more water if necessary while the meat is cooking.

Oh my god, yuck. I’m sorry, but yuck. As it turns out, I really don’t like things that are cooked with dried orange peel. It is just a matter of taste, I’m sure plenty of people would find it good, I am just not one of them. It wasn’t inedible, and I could tell that it was meant to taste that way, but this is the second time I have tried a dish that had dried orange peel and twice I have hated it.

I like marmalade, but I think I will stick to that alone for my orange peel intake.

Aubergine Box


2 medium Aubergines, peeled unless you have found very beautiful ones
For the stuffing:
300g minced pork
2 spring onions, washed, cut into strips, then finely chopped
2.5tso finely chopped ginger
1tsp rice wine
3 pinches of sea salt
1dssp light soy sauce
1dssp cornflour
1 egg white
Seasoning:
Light soy sauce
Chinese cooking rice wine
White caster sugar
Warm water from the kettle
1 spring onion, washed and finely chopped
1 clove of garlic, peeled and finely chopped

First make the stuffing. Mix the pork, 2 of the chopped spring onions, and the chopped ginger together very thoroughly in a bowl. Add the following ingredients, one by one: Rice wine, sea salt, soy sauce, cornflour. Next add the egg white and mix again thoroughly.

Peel the eggplants. Begin to cut a circular slice about 1/4 inch thick, but don’t slice all the way through. Next, make another round slice about 1/4 inch thick, but do slice all the way through. Now you have a half inch slice, that opens up, but is still held together on one end. Do this with all of the Aubergine. Put a heaped tsp of stuffing into each “box”, flattening the mixture evenly like butter. Close the box, and put them on a plate, ready for cooking.
Turn the heat up to high, and heat the wok till it’s hot. Add 2tbsp oil and turn the heat down to medium high. When the oil is hot, add the aubergine boxes, as many as will fit in one layer. After 1-2 minutes the boxes should be brown and toasted on the bottom. Remove from the wok and add 2 more tbsp oil. Cook for another 2-3 minutes on the other side, till brown and soft. Cook them all this way, one layer at a time. Then turn the heat to low, and put all the aubergines back in the wok. Add the soy sauce, rice wine, sugar and 2tbsp warm water from the kettle. Allow the ingredients to simmer on a medium low heat for 5 minutes. Add the remaining spring onion, and the garlic and continue to simmer. Add one more Tbsp water and cover the wok with a lid and simmer for 2 more minutes.


These were actually incredibly easy to make. The cutting and stuffing was no problem at all, and I made them a bit in advance and left them in the fridge till I needed them. That was also no problem. I only did it about an hour before cooking them, but in the future I would feel confident assembling them in the morning and cooking them in the evening if need be. The cooking took very little time start to finish. I had to start with two batches, but they all fit into one pan for the final stages of cooking.

I cannot say enough good things about these, they were wonderful. The flavor and the texture all came out perfect. I saw another version of this recipe in another book, where they made these, and then dipped them in batter and deep fried them. I may try that too someday, but I don’t know, it would be hard to pass up a chance to make them this way. I will make these again and again.

I got this recipe from an odd book. It is a memoir called Music, Food and Love. It’s this man’s story about growing up in China, and being a musician, and then in the back, he also has a collection of recipes from his childhood. Cool book. This recipe rocked!

Chinese Pork Dumplings


170g flour
90 ml cold water
110g minced pork
15 tiger prawns, peeled and deheaded
1 spring onion finely chopped
1 small piece of ginger finely chopped
light soy sauce
sea salt
Chinese cooking rice wine
1 egg, beaten
Sesame seed oil
A handful of fresh coriander, finely chopped

To make the dough, put the flour into a bowl and make a well in the center, then begin to drizzle cold water into the well, a little at a time, stirring with chopsticks around the edge of the well to incorporate the flour and form little lumps. Continue to drizzle the water where ever the flour is still dry, stirring till a dough begins to form. Knead with your hands till you have a piece of round smooth dough. Leave to rest for 20-30 min.
Take a piece of dough, about the size of a mini bread roll, and knead it again, turning and folding it. Then using a wooden rolling pin, roll your dough as thin as paper, into a round shape. Cut into strips, then into triangles. You need to think in terms of making 6-10 little dumplings for each person, so make as many as you need.

To make the stuffing chop the prawns and pork together very very finely, and mix with the spring onion and ginger. Add a little soy sauce, a few pinches of sea salt, a few drops of rice wine and one beaten egg, and mix well.

To make the dumplings: Taking a little of the stuffing mixture, place it towards one corner of a triangle and fold that corner over to cover the mixture. Then fold again in the same direction, so that you can’t see the mixture except through the ends of this little roll. Then, holding your thumbs a third of the way along from either end, twist and turn up, joining the two remaining corners.

To cook: Boil for 3-4 minutes, and serve with some chopped spring onion, a few drops of sesame seed oil and a drizzle of light soy sauce.


These are also from the book Music, Food and Love. First I will say that the dumplings tasted absolutely gorgeous. They were so good that my son has been asking me to make them again at every meal since. So no kidding, they are tasty. That said, I have some issues with the way the recipe is written.

I would only recommend following this recipe, if you have a good amount of confidence in dumpling making. Otherwise, find another recipe that explains things better, and then use this filling mixture.

First is the dough. It’s no problem to make, but it makes a tiny tiny little ball of dough. Really small. It also doesn’t really specify what size each dumpling skin should be, so you are stuck with a tiny small dough, and no idea how far you should stretch it. The skins have to be big enough that the filling doesn’t stick out, or they won’t stand up to the boiling, so they can’t be too small, but if they are too big, you’ll only get a few dumplings out of it.

Then the making of the dumplings… I typed it up just as it is in the book. If you can understand how that’s supposed to work, you have better spatial reasoning skills then I do.

Still, I enjoy wrapping things in dough, so I just made them as small as I could and still manage, and I sealed them up any way I could. I cooked them slightly longer, in case I had made them too big, and changed the cooking time, but after 5 min they were totally and completely done.

Very challenging, but still fun, and in the end we got to eat many tasty tiny dumplings that I loved!

The Farmer’s Joy (Chinese Noodles)


225g/8oz vermicelli (very thin Chinese rice noodles)
350g/12oz white Chinese cabbage
1 large fungus
1 large carrot
4tbsp corn oil
1tbsp chopped spring onion
50ml/2oz clear soup stock
Optional ingredients:
Bamboo shoot
Chinese mushrooms
Bean curd


Seasoning:
2/3 tsp salt
1&1/2 tbsp soy sauce
1 tsp sugar

Soak the vermicelli in cold water for 15 minutes until softened. Cut into sections.
Cut off and discard the root, and any old, withered leaves from the Chinese cabbage. Wash and chop into 2.5cm/1 inch slices. Wash the fungus and slice.
Peel the carrot and chop into large slices.
Heat the oil in a wok and stir fry the spring onion for 1 minute. Add the fungus and carrot slices and stir fry for 1 minutes more. Add the white cabbage and cook stirring for a few minutes.
Add the drained vermicelli, the soup stock, and the seasoning and mix together well. Bring to a boil and simmer, covered, for 1 min.

This was really good. It’s super simple, and like some other things I’ve made from this book (Chinese Cooking), I find that it’s much more subtle then the take away version of the dish that I am used to. In the end it’s just as satisfying, but you can feel much healthier eating it. I added a bit of extra soy sauce, but not much and it was beautiful. Also, I added a bit of Chinese preserved turnip slices on the top. If you get a chance to try these, do. They are really salty, but if you just add a touch to a dish, it can be really nice. The Chinese restaurant that I used to go to in Brooklyn put them on top of the cold sesame noodles.

Tuesday, September 11, 2007

Scallion pancake fry up


I got this idea from Matzo Brie, where you break up the extra matzo and mix it with eggs (this is obviously an oversimplification). I figured why not do it with the extra spring onion pancake the next morning.


Cut the pancake up into bite sized pieces. In a separate bowl mix about 5 eggs with a little milk, salt and pepper. Add some fresh chopped parsley (to combat the onion-y-ness of the pancake, it is breakfast time after all). Then add the pancake pieces into the bowl and stir to coat it all completely.

Heat up a pan (non stick) and melt some butter in it. Add your egg mix and leave it alone till it starts to set, then mix it around in the pan like you were making scrambled eggs till it’s done.


This was really satisfying. The parsley did a good job balancing out the onions, and the thick chewy pieces of pancake made it really filling and comforting. Whenever I make scallion pancakes in the future, I will always set aside a little to make this for breakfast the next day. I loved it!

Monday, September 10, 2007

Scallion Pancakes


600g plain flour
approx 600ml boiling water
6 spring onions
125ml corn oil
2tsp salt

Make the scalded dough (see below) with the flour and water and divide into 4 pieces
Finely chop the spring onions
Roll out each piece of dough to a circle 1/8 inch thick. Brush with a little oil, then sprinkle with a little spring onion and salt. Roll up the dough, and bring the ends together and pinch to seal. Roll into a ball, then roll this out into a 6 inch diameter circle.
Heat 1 tbsp oil and fry each pancake over medium heat until golden brown on both sides. Drain on absorbent paper, and keep warm while you fry the rest, adding more oil to the pan as necessary.

The dough is a bit time consuming, and it’s not the easiest to knead. As compared to an average white bread dough, it definitely puts up a bit of a fight. Still it’s totally worth it. Once the dough is made, the pancakes are nothing, super easy. I skipped the lard that is in the actual dough recipe because it wasn’t mentioned in this recipe, and that worked just fine.

The frying takes a few minutes on each side. I had to adjust the temperature quite a bit because I wanted it to brown nicely on each side, but not burn. A medium heat is your best bet.

The consistency of these is so satisfying. They are sort of chewy and dense and crispy on the outside with the lovely salty onion-y-ness. They totally rock! I made a scallion-less one for my older son who is against most green things these days, it was good too.


Scalded dough
275g plain flour
1tbsp melted lard
approx 300ml boiling water


Weigh the flour and sift into a large bowl. Stir in the melted lard.
Boil the water and measure out the right quantity
Gradually pour the water into the flour, stirring all the time.
Keep stirring to mix thoroughly, but do not bring the mixture together. Cover the bowl with a damp cloth and leave to stand for about 10 minutes.
Knead the mixture to bring it together to a rough dough, and turn out of the bowl
If necessary, add more flour or water, the dough should be damp, but not wet. Cover with a damp cloth and leave for 20 min.
Knead the dough by vigorously pulling and pushing it apart.
Finish off by kneading it with the palm of your hand until it is really smooth (about 15-20 minutes).
If you do not want to use right away, put in a bowl and cover with a damp cloth.

Sunday, September 09, 2007

Baked Brie Cheese

So I know I’ve been MIA for some time now. I was having trouble making it to the computer, but I was still cooking loads of fun stuff. This is one of the best things that I came across…


2x250g (or similar size) wheel of brie (or similar cheese)
1 small apple
1/4 cup dried cranberries
1/4 cup slivered almonds
1 spoon brown sugar
1 spoon melted butter

This is one of those recipes that is not an exact science. You can adjust the ingredients to your liking, but this is a good jumping off point.

Cut the wheels of cheese in half across the middle (like a hamburger bun). Mix together all the other ingredients in a bowl. Open up the cheese, and place a quarter of the apple mixture on top. Place the top back on the cheese (like a sandwich), then put another quarter of the apple mixture on top. Do the same with the other cheese and place them both on baking trays (ones that have sides in case the cheese leaks out), and put them in the oven at 180 for up to 20 minutes, but start checking on it after 5 minutes. The cooking time will vary with the type, size, and starting temperature of the cheese. It’s done when it looks warm and melt-y and beautiful. Serve with little slices of bread to dip into it.

My sister-in-law and her partner were out here visiting, and they taught me how to make this. It is absolutely one of the best things that you can do with a cheese. It’s so good that it’s impossible to stop eating it till it’s all gone. The texture of the almonds and the combination of the slightly sour cranberries and the sweet apples and the melt-y-ness of the cheese, is to die for. This dish is gorgeous. It’s also dead easy and can be done way in advance (just put them together and leave them in the fridge till it’s time to throw them in the oven). This makes it the perfect thing to have for guests.

I will be making this all the time!

Thanks guys!!!!

Tuesday, September 04, 2007

A bit of a holiday

Hey,

I've been taking a bit of a holiday from typing while I've had guests. I've still been cooking though, so I will try to post some hi-lites later this week.