Alternatives: Cod, Halibut, Salmon
4 portions of fish fillet, weighing about 110g-175g (4-6oz), with skin on, scaled
Sunflower oil
Salt and pepper
Roughly chopped fresh chives, to garnish
For the compote
2.5cm (1 inch) piece of fresh root ginger, grated
1 small red onion, chopped
2 garlic cloves, chopped
30g/1oz butter
500g/1lb2oz red plums, halved and stoned
60g/2oz caster sugar
2 whole star anise
1/2 – 1 Tbsp balsamic Vinegar
Salt and pepper
Preheat to 240c/450f. Season the fish on both sides with salt and pepper. Set aside.
To make the compote, cook the ginger, onion and garlic gently in butter, without browning, until tender. Add all the remaining ingredients except the vinegar salt and pepper. Cook gently over a low heat, uncovered for 5 minutes, stirring once or twice, until the plums are tender but still holding their shape more or less. Stir in the vinegar, then taste and adjust the seasoning. Re-heat gently, until warm rather then hot, just before serving.
Put a heavy ovenproof pan or griddle over a high heat to heat through. Pat the fish dry on kitchen paper and then brush the skin side with oil. Place, skin side down, on the pan or griddle and leave for 2 min. While it cooks, brush the upper side with oil. Turn over, immediately pop in the oven and roast for a further 3 min.
Warm up the compote. Serve skin side up, sprinkled with chives, with the compote on the side.
This one was good. We gave it an 8 out of 10. I decided to use Salmon, and the flavors worked really well together. One of the things I like about this dish is that it is incredibly quick to make, even though it tastes extravagant. The part that takes the longest is preheating the oven (it requires a really hot oven). This is a dish that could easily be made after you come home from work. You could even stone and halve the plums the night before, but you wouldn’t have to.
Thursday, August 23, 2007
Really Good Sandwich
Wednesday, August 22, 2007
"Janet got her passport" pie
AKA Strawberry Rhubarb pie with a cream cheese crust
Cream cheese pie crust
For a bottom and top crust (or lattice crust). If you only need a bottom crust, then cut this in half.
Whisk together:
2cups, plus 4 tbsp flour
2tbsp sugar
1/2tsp salt
Cut into 1/4 inch pieces and add:
1&1/2 sticks cold unsalted butter
6 ounces cream cheese
using a pastry blender or 2 knives, cut the butter and cream cheese into the dry ingredients until the mixture resembles coarse bread crumbs with some pea sized pieces.
Drizzle over the top:
4 to 6 tbsp cold heavy cream
Stir with a fork till the dough begins to gather into moist clumps. Press the dough into two flat disks, wrap tightly in plastic, and refrigerate for at least 1 hour or up to 2 days.
Roll out the bottom crust and line your greased pie tin with it.
Pie filling:
Measure out 5 cups of fruit
2&1/2 cups of rhubarb, unpeeled and cut into 1 inch lengths
2&1/2 cups strawberries, hulled and halved lengthwise
Combine with:
1 cup sugar
1/4 cup cornstarch
1/4 tsp salt
let stand for 15 minutes, stirring occasionally. Pour into the bottom crust and dot with 2tbsp unsalted butter, cut into small pieces. Add the top crust and cut vent holes, or add a lattice top.
Lightly brush the top of the pie with milk or cream and sprinkle with 2tsp sugar.
Bake at 425f for 30 minutes, then turn the oven down to 350f and slip a baking sheet under the pie. Bake for 25-35 minutes more till juices are bubbling through the vents. Let it cool completely before serving.
I just recently saw the movie ”Waitress”. It was cute, I enjoyed it. The main character had this habit of giving the pies she made, names. The names had more to do with what was going on in her life, then the actual pie, like there was a ham and brie cheese pie with egg called the “I don’t want to have Earl’s baby” pie. I got a kick out of that, so in honor of the movie, I’m calling this the “Janet got her passport pie” Because I made it for my sister-in-law who is visiting us for the first time ever.
This was really easy to make. Any crust will do and be good, but the cream cheese crust is extra nice because the slight tang of cream cheese works well with the super sweetness of the strawberries. It’s also got a great texture.
The cornstarch and the letting it cool all the way are really important because that’s what gives the filling the almost gel-like quality that stops it from running all over the plate.
This was really good, and it’s a good pie to make for guests because it has to be made in advance anyway, and it looks so pretty.
Here's the boys picking the strawberries for the pie...
Tuesday, August 21, 2007
North African Chicken with special couscous
Chicken with preserved lemons and olives
1 chicken, jointed (1.5-2kg)
1tbsp olive oil
1 large onion, chopped
2 garlic cloves, chopped
2 tsp ground cumin
1/2 tsp ground ginger
1/2 tsp ground cinnamon
1 fresh chili, finely chopped (or 1/4tsp cayenne pepper)
A pinch of saffron strands steeped in 2 tbsp boiling water
275g ripe tomatoes skinned, deseeded and chopped
250ml stock or water
100g brown olives, such as kalamata, or green olives
3tbsp chopped preserved lemon (use the peel only)
the liver from the chicken if available
3-4 tbsp chopped coriander
Heat the oil in a large heavy based casserole, add the chicken pieces and cook until browned all over. Transfer to a plate and set aside. Then add the onion and garlic to the casserole and cook gently until softened and lightly browned. Stir in the ground spices and chilli and cook for 1-2 minutes longer.
Return the chicken to the pan, turning to coat it, and pour over the saffron water. Add the tomatoes and the stock or water and bring to a very gentle simmer. Cover tightly and cook over a very low heat for 30 – 40 minutes until the chicken is tender.
Stir in the olives and preserved lemon, and the finely chopped liver if you have it, and cook for another 15 minutes. Skim off some of the surface fat, if it seems excessive. Season to taste with salt and pepper, stir in the coriander and serve with special couscous, or plain boiled rice.
This was from The River Cottage Meat Book. Really really good book!!!
I loved this! The preserved lemon is really important to the flavor, so don’t try substituting regular lemons, they won’t work at all. If you are in the uk, you can get preserved lemons at most Tesco stores. It might be harder to find in the states but there is a recipe for making your own here.
This is a north African recipe, and it’s flavor is totally authentic. It’s really impressive. The taste of the saffron comes through very well, and mixed with the lemons and olives, well, this one is not to be missed. I would definitely make it again.
If you can, I highly recommend that you make it with the special couscous because it rocks the whole world.
Special couscous
300g couscous
50g raisins
350ml hot water or light stock
1/2 – 1 tsp harissa paste, to taste
4tbsp olive oil
1 onion finely sliced
25g butter
25g flaked almonds, lightly toasted
1-2 tbsp black olives, stoned and halved
2tbsp chopped coriander
1 tbsp chopped mint
lemon juice to taste
Salt and pepper
Put the couscous and raisins in a large bowl. Mix the water or stock with the harissa, then pour it over the couscous, cover and leave for 10 minutes. With a fork, or your fingers, gently fluff up the couscous, separating the grains. Stir in the oil and some salt and pepper.
Fry the onion in butter till soft and golden. Add it to the couscous with the almonds, olives, herbs, and a good squeeze of lemon juice, then fork through till everything is well mixed. Taste and adjust the seasoning with more salt and pepper or harissa or lemon juice if necessary.
Seriously. So good. I am going to eat couscous this way all the time now. It’s so easy, and so good.
Monday, August 20, 2007
A new tea drink
This was just a quick something. I think it would be nice on a winter night.
Quick note, you can really only make this in the uk…
I steeped a cup of decaf tea, then added…
Ginger drink (like a non-alcoholic ginger wine) about 1/2 to 1 shot
Lemon juice, about 1/2 shot
Cinnamon, a sprinkle
And to pull it all together, a splash of peach flavored Robinsons.
This had a nice flavor, and a bit of a bite. The actual amounts can be adjusted to taste.
Sunday, August 19, 2007
Heather Honey Cake
85g/3oz butter, plus extra for greasing
85g/3oz caster sugar
2 eggs, lightly whisked
100g/4oz heather honey
225g/8oz plain flour
1tsp baking powder
Heat oven to 180c. Butter a 20cm baking tin and line the base with baking parchment. Cream the butter and sugar till light and fluffy. Gradually beat in the eggs, followed by the honey. Sift the flour and baking powder, then fold in gently.
Spoon the mixture into the prepared tin and level the surface. Bake for about 30 min, or until golden and shrinking slightly from the sides of the tin. Turn out onto a wire rack, and peel away lining paper. When cold, slice and serve spread with unsalted butter.
This one was from Good Food Magazine.
This was really fast and easy to make. We were going out for the day, so I threw it in the oven first thing in the morning and took it with us on the train. It’s a good traveling food because it’s meant to be eaten cold, so you don’t have to worry about it cooling off, and because it’s cake, so it makes young boys sit still on trains in anticipation. All good.
I just used regular honey and it still came out really well. It’s a good breakfast-y cake, like coffee cake. It’s sweet, and the outside is just a tiny bit chewy, but it’s not so sweet that you can’t have it for breakfast with a little butter.
This was good, and everybody enjoyed it right down to the last little pieces that were used as a late afternoon calming down session. I’d make this again.
Saturday, August 18, 2007
Aromatic Pork Belly Hot Pot
1.5kg Pork belly, with the rind on
About 1.5 liters Pork or chicken stock, if available, otherwise water
12 spring onions
100ml light soy sauce
75ml Chinese rice wine
25ml rice wine vinegar
2tbsp soft light brown sugar
3 star anise
10cm piece of fresh ginger root, peeled and sliced into rounds
a good pinch of dried chili flakes
Remove the bones from the pork belly and cut into rectangular chunks, about 2.5x5cm. Put them in a large pan, pour over enough boiling water just to cover, then bring back to the boil. Simmer gently for about 5 min, skimming off the scum that rises to the surface, then drain through a colander. Rinse out the pan if necessary, return the pork to it and pour over enough boiling stock or water to cover it again. Cut 5 of the spring onions in half and add to the pan with the soy sauce, rice wine, vinegar, sugar, star anise, ginger and chili flakes. Stir well and bring back to the boil. Reduce heat, cover tightly and simmer very slowly for about 2 hours, turning the meat occasionally, until the pork is very tender, soft and succulent.
Remove the pork with a slotted spoon and set aside. Strain the cooking liquid into a clean pan, skim off as much fat as you can (but don’t worry about leaving a little), then boil the stock hard to reduce and concentrate the flavors. It should be lightly syrupy and intensely aromatic, but don’t over reduce as the soy sauce could make it too salty.
Meanwhile, thinly slice the remaining spring onions on the diagonal. Return the pork to the sauce and heat through. Serve over plain noodles in warmed soup bowls, with plenty of the broth ladled over and the sliced spring onions scattered on top of the meat.
This was from The River Cottage Meat Book which I am absolutely and totally in love with right now.
I had great fun with this recipe. I had never bought belly pork before, so I asked my butcher what exactly it looks like, so I could decide if I wanted it or not. He disappeared into the back, and the reemerged with what looked like the whole bottom of a pig. It was still vaguely pig shaped. It was really cool to see exactly what I was getting. I would recommend going to a good butcher for this, they’ll be able to help you out. I got to see the whole chunk of meat that I wanted, and then he boned it and cut it up for me too because it’s a bit of a job when the meat still has the rind on. My knives aren’t that good.
The actual cooking was super easy. It takes awhile, but doesn’t require all that much effort. I used about 2 liters of liquid for the long cooking (I had to in order to cover the meat), half good chicken stock, and half water. This wound up being a good mix, the concentrated broth wasn’t too strong, just really beautifully aromatic, just like it said, and very tasty. The flavors of the spices really came through.
Anyone who has seen belly pork knows that this is about as far from a low fat dish as you can get, but do try this. It’s soooo good! I love it. It’s a fairly authentic Chinese dish from what I understand, and it looks like it is probably the dish that was bastardized in order to create the modern monstrosity of pot noodles.
It’s noodles, it’s seriously good soup, and it’s huge chunks of meat. As you would expect, everyone loved it.
Thursday, August 16, 2007
A bunch of stuff
Hey,
I've been cooking up tons, but have not had time to sit at the computer lately. Here are some hi-lites of the things of I've been making. I invented a dessert...
I learned the secret to perfect roast potatoes...
I came up with a semi-successful couscous and vegetable casserole...
Found the most amazing summer bean soup...
And had some more dessert...
I will try to get all the recipes up soon, sorry about the slacking. It's been a bit busy these days.
Monday, August 13, 2007
Yorkshire Pudding
250g plain flour
1tsp salt
4 medium eggs, plus 2 yolks
300ml milk
300ml water
2tbsp olive oil
Put all the ingredients except the oil in the food processor, with the plunger removed to assist with aeration, and pulse for 5 – 10 second bursts until you have a smooth batter.
Rest the batter for at least half an hour before making the pudding.
After you take the roast out of the oven turn the heat up to 220c
Here I actually diverged a little because he makes one giant Yorkshire pudding, but we wanted the small individual ones. So put a little oil in the bottom of each of the cups of a muffin tin, and put the tin in the oven as it’s heating up. When the oven is hot and the oil is too, take the tin out and pour in to fill each cup about 2/3 of the way. Put in the oven for 15-20 min, till they are all puffed up and golden brown.
I have loved these ever since I moved out here, and I can’t believe it took me this long to make them. Yorkshire puddings rock! I only made half a batch of the batter, because I only have one muffin tin. It made just the right amount for a 12 cup tin. The batter was thinner then I thought it would be, but then, I had never made it before. Once it was blended, I put it into a pitcher in the fridge. That way, when the time came, it was even that much easier to pour it into the hot tin.
The boys loved these more then any other food in the world. My youngest spent the whole meal asking for more. Next time, I might have to buy a second tin and make a double batch, just to keep them happy.
I think everyone out there should make these once. They sell awful pre-made ones in the supermarket, but why anyone would want those is beyond me. These are so easy, and they fit in perfectly with the timing of the roast and the potatoes, and the batter gets made in advance, so even though there is a bit of a flurry of activity when the roast comes out, all you have to do for these is pour and wait.
Seriously, make these once, and you’ll be addicted for life
Beef Bone Gravy
Actually a stock reduction
I forgot to get a photo of the gravy, sorry...
At least 2 liters good clear beef stock
1/2 bottle of red wine
salt
Put the stock in a clean heavy based pot, at least 4 liters in capacity. Add the wine and boil hard to reduce, skimming off any rising deposits occasionally. As it becomes darker and more concentrated, taste regularly. It will cry out for salt, but do not salt it yet, as the saltiness will concentrate as you continue to reduce. Stop reducing when you have a rich, concentrated beefy sauce that is lightly syrupy, but not too sticky. Only at this point, should you season to taste with salt. Finish the gravy at the last minute by adding the deglazed pan juices from your roasting tin or frying pan , but exclude as much of the fat as you can. Strain through a sieve and briskly whisk the two together. You can keep this chilled in the fridge for up to a week. Before serving, gently warm it until not quite boiling, and “refresh” with a small splash of wine.
This is so cool. You have to make this to go with a roast beef for three reasons, one is because it is the perfect accompaniment, and it tastes just so amazingly good. Two is because it will make you sound really professional when you say “actually, it’s not really a gravy, it’s a stock reduction sauce”. Three is because it is even easier to make then gravy is, and you don’t even have to wait for the roast to be done to get it ready.
How cool is that?
I only made a half size portion of this recipe, because I wasn’t feeding an entire army of starving soldiers. It was plenty and we still had leftovers. Also, I didn’t need any salt, it was perfect without it.
I cannot stress enough how easy this is. You just put it in a pot and then check on it until it is done. I skipped the straining step too, and it didn’t hurt it any at all. My one suggestion would be that you make sure you are starting with a good stock (I used stock cubes, but really good ones), because the flavor relies on it.
I will always make this to go with a roast beef, there is no question.
Sunday, August 12, 2007
The Secret to the perfect Roast Beef
1 joint of aged rib of beef (3-4 ribs worth), or aged sirloin on the bone, weighing about 4-6kg
A little olive oil or good dripping
Salt and freshly ground black pepper
Massage the whole joint with olive oil or dripping, and season lightly all over with salt and pepper. Place in a roasting tin and put in a hot oven (220-230c). Cook for about 30 min, until the meat is well browned and sizzling. (If you have chosen a piece of sirloin with the fillet still attached, carve off the fillet at this point or it will get horribly overcooked).
Turn the oven down to 160c (leave the door open for half a minute to help it cool down). Then use the following guidelines:
Allow 9-10 minutes per 500g for very rare meat, 12-15 for medium, or 18-20 if you insist on having it well done.
Remove the meat from the oven Transfer to a warm serving plate or carving tray and cover loosely with a piece of foil. Leave to rest for NO LESS THEN HALF AND HOUR! Before carving and serving.
So this recipe may seem a bit obvious to some people. It’s just roasting a piece of meat, but actually, it taught me the elusive tricks to making really beautiful perfect roasts that are just like at the best restaurants and taste like every roast wishes it could taste.
Here are the two big secrets…
One is that you have to cook it at a super high temperature in the beginning to sort of seal the outside of it. This will give it a great texture, and also help to keep all the juices in. After that you cook it slower in a cooler oven so that you don’t loose the beautiful red center (which is what happened to me last time I tried one of these, and I was so gutted I haven’t had the heart to try it again till now).
The other trick is making sure you let it rest for at least the half an hour no matter how good it smells and how hungry you are. From what I understand, this helps to redistribute the juices in the roast, so that it’s not dry tasting.
For this recipe, I consulted the The River Cottage Meat Book. I have to say, this book is amazing. If you want to know everything about cooking meat, get this book. It may be overwhelming at first. I actually had it for a while before I was ready to tackle it. The whole first half is like a text book for taking an advanced meat class, then the second half is the most amazing and varied and creative and non threatening recipes for all kinds of meat. I love this book.
The roast I used was slightly different. I couldn’t find an aged bone in rib roast of that size. I wound up using a 2.5kg, boned and rolled rib roast. It was not aged, but it was Scottish beef, which is supposed to be extra good. The difference was no problem at all, I just used his timing table, and then I had the best roast beef dinner in the world. I was so proud of it, it was just how I wanted it to be.
I also used the same book to make all of the trimmings, which I will try to blog tomorrow, as it’s going to be a bunch of typing. All together it was a six recipe meal, all from this book, and all of it so good that you could seriously cry. It was our latest guests last dinner here, and they could not stop being amazed by how good it was. This was probably one of my biggest successes. Buy this book. Make this roast with all the trimmings.
Saturday, August 11, 2007
Spiced Seed Mix
75g pumpkin seeds
75g sunflower seeds
1tsp reduced–salt soy sauce
1/4tsp chili powder
Preheat to 190c/375f
Mix all ingredients together and transfer to a baking sheet
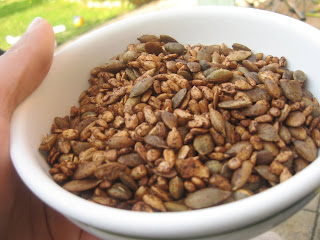
Cook for 10 min till dried and slightly golden. Leave to cool then store in an airtight container, either in the fridge or freezer.
These were from The Diabetes Weight Loss Diet.
Obviously they are dead easy to make, and they taste nice. I think they make a great salad topping too. It doesn’t seem like a lot of chili powder, but it’s enough to give them a subtle flavor. These would be good to keep around the house.
Friday, August 10, 2007
Cheesy Zucchini (courgette)
2tbsp extra virgin olive oil
4 large cloves of garlic, thinly sliced
1.5lbs medium sized zucchini or other summer squash, cut in 1/2 inch thick slices
2tbsp coarsely chopped flat leaf parsley
1/4 tsp salt
1/3 cup freshly grated parmesan cheese
1/2 cup freshly grated mozzarella cheese
Heat olive oil in a large non-stick pan over medium heat. Add the garlic and cook , stirring frequently till softened, 1-2 minutes.
Add the squash and stir to coat it with the garlic oil mixture. Cover the skillet and cook the squash, stirring occasionally, until it is glossy and crisp tender, 4-6 minutes.
Sprinkle the parsley and salt evenly over the squash and cook, stirring frequently, until the parsley wilts, about 1 minute longer. Stir in the parmesan cheese and stir constantly until it melts, about 1 minute.
Sprinkle the mozzarella cheese evenly over the squash, cover the skillet again, and remove from the heat. Let the squash sit until the cheese melts, 1-2 minutes.
Serve immediately
This was a nice new way to make zucchini (courgette). It was really simple and took really no time at all. I got this one from the book Food to Live By.
This is another occasion where it was nice to find a new thing to do with a food that we eat all the time. Also, it had melted cheese, and everything in the world is better, when there is melted cheese around.
I’ll have this again.
Wednesday, August 08, 2007
Herbed Turkey Loaf with Honey Mustard Glaze
2tbsp Olive oil
3 medium size yellow onions, finely chopped (about 2.5 cups)
1 tsp salt
1/2 tsp freshly ground black pepper
8 oz baby spinach (about 6 cups)
5 oz baby arugula (about 6 cups)
1/4 cup minced fresh basil
1/4 cup minced fresh flat leaf parsley
3 large eggs, beaten
2 tbsp ketchup
1tbsp Dijon mustard
1/3 cup Worcestershire sauce
1/2 cup chicken stock
2.5 lbs ground turkey breast
1 cup bread crumbs (fresh or dry)
2tbsp honey mustard, or 4.5tsp Dijon mustard mixed with 1.5 tsp honey
Preheat to 375f/190c
Heat the olive oil in a large, non-stick skillet over medium heat. Add the onions and cook, stirring frequently until soft, about 5 min. Add the salt and pepper and, using a slotted spoon, transfer the onions to a small bowl to cool.
Add the baby spinach and arugula and 1 tsp of water to the skillet (if all the greens don’t fit in the skillet at first, add more greens by the handful as they wilt). Cook the greens until all of the wilt, 2-3 minutes. Remove the skillet from the heat and let the greens cool for 5 minutes, then add the basil and parsley and stir to combine.
Place the eggs, ketchup, Dijon mustard, Worcestershire sauce, and stock in a large bowl and whisk to combine. Add the ground turkey, bread crumbs, and cooked onion and blend thoroughly using your hands.
Place half of the turkey mixture in a 10-inch loaf pan, or in 2 eight inch loaf pans. Spread the wilted greens evenly on top. Spread the remaining turkey mixture over the greens. Smooth the surface of the turkey loaf and brush It with the honey mustard.
Bake the turkey loaf until an instant read thermometer reads 160f about 1.5 hours for a 10 cup pan, or about 50 minutes for the 2 smaller pans.
Let the turkey loaf rest in the pan for about 15 minutes. To serve, turn the turkey loaf out of the pan, slice it and arrange the slices on a serving platter. If you are not planning to serve the turkey loaf at this time, let it cool in the pan and then wrap the pan tightly in plastic wrap. It can be refrigerated for up to 5 days. For longer storage, wrap a layer of kitchen foil over the plastic wrap and freeze the turkey loaf in the pan. It will keep for up to 2 months. Let the loaf thaw overnight in the refrigerator and unwrap it before reheating in a 375f oven for 20 –30 minutes.
I don’t make a lot of meatloaf, and I also don’t really cook with turkey too much, so I thought I’d try this one. It’s from a book called Food to Live By, which has been a really consistently wonderful book. I turn to it a lot when I have guests, as I do now. It’s hard sometimes to cook a brand new recipe when you have guests, because you want something that you can be sure about, when you are going to be serving it to other people. This is one of the books that I have total faith in.
This recipe takes a while to cook, but there is no part of it that is difficult or complicated. I really liked making it, partly because it has that layer of green in the middle, and I’m a sucker for food with layers (I don’t know why, but I am).
The end result was really good. It was really tasty, and the layers added a nice touch. Also, I feel like it’s a little better for you because it’s made with turkey, which is leaner than your average beef mince.
I made one large one instead of two small, because we have people over, but in the future when I make it, I would make the two small ones and freeze one of them for later. I love when they give freezing and reheating directions in a recipe.
This was an all around winner, though the boys picked out the green bits from theirs.
Tuesday, August 07, 2007
Sorry
Hey,
I know I've been gone for a couple of days, I've had some visitors. I will be back soon, probably tomorrow.
Thursday, August 02, 2007
Pot Roasted Chicken with sweet and sour sauce
1X2kg/4.5lb chicken, preferably organic
Sea salt and freshly ground black pepper
1 handful of fresh parsley, roughly chopped
4 thumb size pieces of fresh ginger, grated with skin left on
2 red peppers, halved and de-seeded
2 yellow peppers, halved and deseeded
4 red onions, peeled
2 fresh chillies, snapped in half
1 ripe pineapple, peeled, quartered and chopped
1tsp fennel seeds, crushed
Olive oil
2tbsp sugar
6tbsp balsamic vinegar
Preheat to 190c/375f
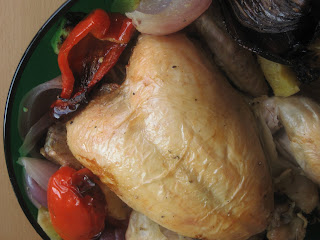
Season your chicken generously inside and out and stuff the cavity with the mixed parsley and ginger. Cut your peppers and red onions into quarters and put them into a cold casserole pan. Add the chilli, pineapple, and crushed fennel seeds. Drizzle with three good lugs of olive oil, sprinkle with a little salt and pepper, and toss until well coated. Place your chicken on top, pat it with a little oil and cook in the middle of the preheated oven for 1.5 hours. The chicken is ready when the bones can be easily pulled out of the thighs.
Once cooked, drain the chicken juices over the pan, remove the chicken to a plate with half the vegetables and pineapple, and allow to rest for 5 minutes while you make your sauce. Put the remaining vegetables and pineapple from the pan into the food processor, with the sugar and balsamic vinegar and correct the seasoning with a little salt. Blend to make a lovely sauce – add a little boiling water to loosen and thin out if need be. You could pass it through a coarse sieve to make it even smoother, but I don’t. Season to taste.
Serve with some stir fried noodles, or some steamed or boiled rice.
So you know the sweet and sour chicken that you get at the Chinese take away? It’s florescent, and so totally unnatural that you have to stare, and yet, it’s kind of tasty. Imagine if you could have a version of that, without the day-glow, and all made out of healthy food. That’s what this is. It really tastes so similar, I couldn’t get over it, though it looks completely different.
This is also super easy to make as you just throw everything in a tray, and put it in the oven.
It was a little more complicated for me because I got a chicken that was much bigger, and I was afraid the vegetables would get burned if I left them in longer (I think they would have). To make it work, I prepared the chicken and put it in a small pan, covered it and baked it for 40 minutes, while it was cooking I got all the vegetables ready. At the end of the 40 minutes, fast as I could (because you don’t want it to cool down at all) I took the part cooked chicken out of it’s little pan and proceeded as normal. It worked fine, chicken was done, veg were not burned.
This was a Jamie Oliver recipe, and it went over really well. We loved it, and so did our guests.
Wednesday, August 01, 2007
Sunday pot roast
1kg piece boneless and skinless pork loin
2 tsp dried sage
freshly ground black pepper
2 large onions, each cut into 6 pieces
500g sweet potatoes, cut into chunks
500g chantenay carrots, scrubbed, or large carrots, cut into chunks
300ml unsweetened apple juice
2 dessert apples, cored and each cut into 6 wedges
400g fine green beans, cooked
Preheat to 190c. Wipe the meat then sprinkle the surface of the fat with half the sage and season with pepper. Set it in an ovenproof casserole dish, cover and cook for 30 minutes
Add the onions, sweet potatoes, carrots, apple juice and the rest of the sage and return to the oven for 45 minutes until the vegetables are almost tender.
Add the apple wedges and return to the oven for a further 15 minutes. Test the meat with a skewer to make sure that it is cooked, then remove from the oven and leave to rest for about 15 min before carving.
Serve with the green beans.
This is another recipe from The Diabetes Weight Loss Diet.
This is a really easy one to make. It’s one of those recipes that’s basically; throw something in a pot, wait, throw something else in the pot, wait. Meals like this are great to make when you have people staying with you because even though they take a while to cook, there is no intensive labor, so you can be social the whole time.
It also came out really nicely. It was tons of food, we even had left overs without making anything extra to go with it. The pork was really sweet from the apple juice, and nicely tender too. I cut the carrots into giant size chunks so that they wouldn’t be mushy by the end. They were perfect. Also, sweet potatoes are always good and fun.
This was a nice and easy alternative to a traditional pot roast. Everybody enjoyed it.
Subscribe to:
Posts (Atom)